
A Digital Home Planetarium
How to make a home planetarium using cardboard, a mirror, and a digital projector.
One of the main difficulties with learning about the nighttime sky in a classroom is that classes are usually held during the daytime. If you are a teacher, you are normally teaching indoors during the daytime, and to show students Leo or Scorpius, you need to be outdoors at night. Homeschool teachers and small groups might be able to arrange special night-time observing sessions, but this isn’t normally feasible for larger schools.
One daytime option is a field trip to a planetarium, but very seldom do planetaria take full advantage of the educational possibilities of a star projector. In my experience, you basically get an IMAX movie, and a minute or two devoted to the star projector, completely neglecting the teaching potential of having full control over an artificial sky. It would be much better for you, the teacher, to take control of the star projector, to be able to point out all the constellations one by one, to show their gradual drift through the sky by speeding up the motion, to show the daily and annual motions of the sun and moon through the sky, and to speed up the drifting motions of the planets among the constellations. A planetarium of your own could be a fantastic teaching tool for observational astronomy.
Controlling the Sky
Many years ago, my students and I built a planetarium dome out of cardboard, and I projected the nighttime sky onto it with a personal computer, a digital projector, and a mirror. This enabled me to control the stars, the sun, the planets, and even the blue daytime glow. You can do this, too. You can make what is basically a large cardboard “fort” with a sky that you can control. The rest of this article is a description of how to build your planetarium.
At my school, we already owned a digital projector, and the expense for the rest of the supplies was under $400. We bought nearly all of our supplies new — you may be able to build a planetarium for less, depending on how resourceful you are.
The Dome
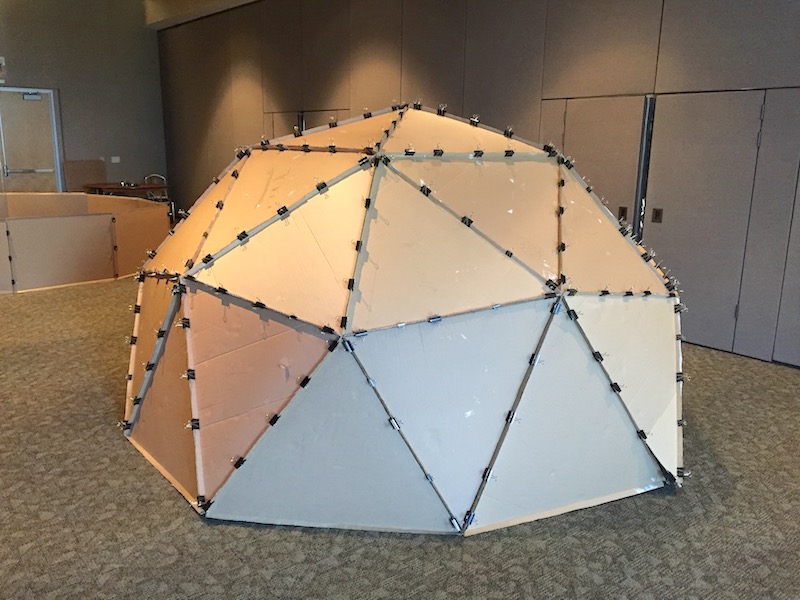
To make the dome on which to project the sky, the students and I constructed a 12′ diameter geodesic dome from cardboard triangles, painted white on the inside, held together by large binder clips pinching flaps along the edge of each triangle, and lifted off the ground a couple of feet by a wall of cardboard rectangles. It looked like this:
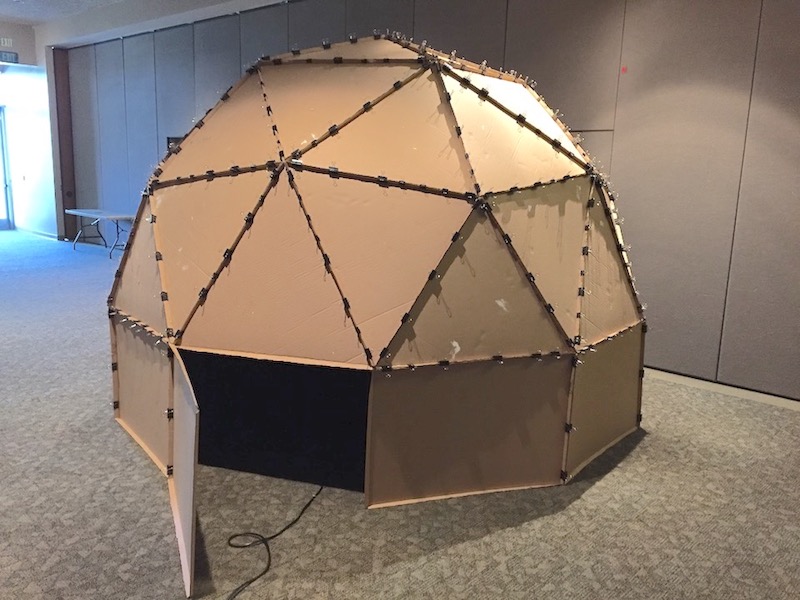
(Thanks to Mr. Jeff Adkins for giving me this idea. His description of his original dome is here.)
Preparing the Cardboard Panels
For the dome and wall, you need to cut 40 triangles and 10 rectangles out of cardboard. For a dome roughly 12 feet across, all 50 pieces need to be roughly 3-4 feet on a side. Where do you get that much cardboard? I tried finding scrap cardboard from retail stores, thinking that they receive shipments in cardboard boxes, but few places receive goods in boxes with large enough sides. Eventually I gave up and ordered 4′x8′ sheets of corrugated packing cardboard from a packing supply store. The bundle cost a little under $200, but the convenience of having clean blank sheets of a regular size was worth a lot. Jeff Adkins’ site gives some other ideas for where to obtain cardboard. Packing cardboard comes in a few different thicknesses — mine was ⅛″. Thicker cardboard would presumably make a sturdier dome, but would also be harder to cut and fold.
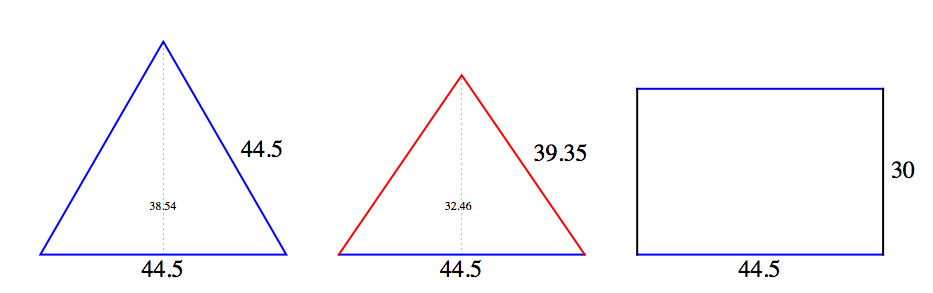
Now, all those triangles and rectangles — exactly what size and shape do they need to be? The following measurements will produce a dome 12 feet across, which will comfortably hold a class of 15 elementary students, and uncomfortably hold a class of 15 junior high students. You can make the dome any size you want — simply multiply or divide every measurement by the same scale factor. Of the 40 triangles, you need 10 equilateral triangles and 30 isosceles triangles, with dimensions shown below. All blue sides are 44½ inches, and all red sides are virtually 39⅜ inches. These dimensions will enable you to cut three triangles from each 4′x8′ sheet of stock cardboard, if you are careful. You may want to make a spare or two of each size, in case any of the panels get lost or damaged.
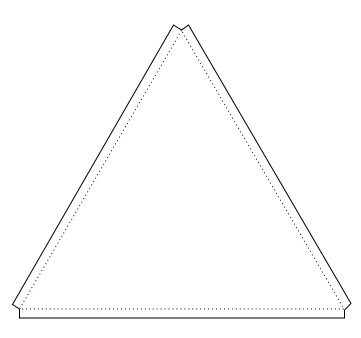
To manufacture the cardboard triangles, I suggest drawing and cutting out a single panel of each shape, then using those as templates to trace the outlines for the rest of them. To manufacture a template triangle, you can use the “compass and straightedge” technique: Start by drawing the line representing the base (the longest side in the case of the isosceles triangles). One simple way is to lay a yardstick alongside the edge of a blank piece of cardboard, then trace along the yardstick, making a line parallel to the edge and inset about 1 inch. (You can’t use the edge itself, because you need to leave space for the flaps that will fold up and bind the triangles together.) Next, pin or hold one end of a string or stick at one end of the base, measure out the appropriate length of string, fasten a pencil at that point, and draw a circular arc through the point where you think the peak of the triangle should be. You are using the string or stick as a giant drawing compass. Re-pin the string to the opposite side of the base and repeat the procedure, drawing a second arc that intersects the first one. The point where the two arcs intersect is the third vertex of the triangle—use a straight edge to connect it to the two ends of the base, and form the triangle.

You have just traced the face of the triangle, the portion that will fill the proper triangular space in the geodesic dome. But around this face there must be flaps that will fold out and will be used to bind each triangle to its neighbor. For this, you just need parallel lines along each edge, an inch or so to the outside. Again, a simple way to draw these is to lay a yardstick along the outside of the triangle, then trace along the outer edge of the yardstick. The flap should be an inch to an inch and a half in width — ideally the same as the depth of the binder clips you intend to use. Whether you taper or block the flap at each end doesn’t make a great deal of difference, as long as you don’t damage the vertex of the triangle.
Once the templates are made, you simply trace them to make all the other triangles in as efficient an arrangement as you can on the blank cardboard, then cut them out, fold the flaps up, and paint the inside white. To fold the flaps, I recommend laying a yardstick or something similar along the inside of the fold line, sliding your hand underneath the flap on the outside of the line, and gradually creasing the cardboard from one end to the other. Using a straightedge to guide the fold produces a much neater fold than doing it free-hand. To paint, use a cheap water-based, roller-applied flat white paint. The flaps will fold out to be pinched by the binder clips, so paint the side opposite to the direction of the flap-folds. You don’t have to be too finicky with the paint job, but the more careful you are, the neater and more professional the dome will look on the inside.
By the way, we had serious curling problems with our triangles. The wet paint caused the cardboard triangles to warp as they dried, even if they were lying flat. The curl can be more-or-less removed by pressing them after they are dry: Stack them neatly, and place a wide flat weight, like an overturned table, on top of them for a while.
What about the rectangles? Do you need to paint the inside of the cardboard wall? In general, you want the interior of the planetarium to be as dark as possible, so you could paint the inside of the walls black. I didn’t, mostly for time considerations, and I didn’t find incomplete darkness to be too harmful. I actually found it helpful to have a little ambient light to work by, and to see the students by.
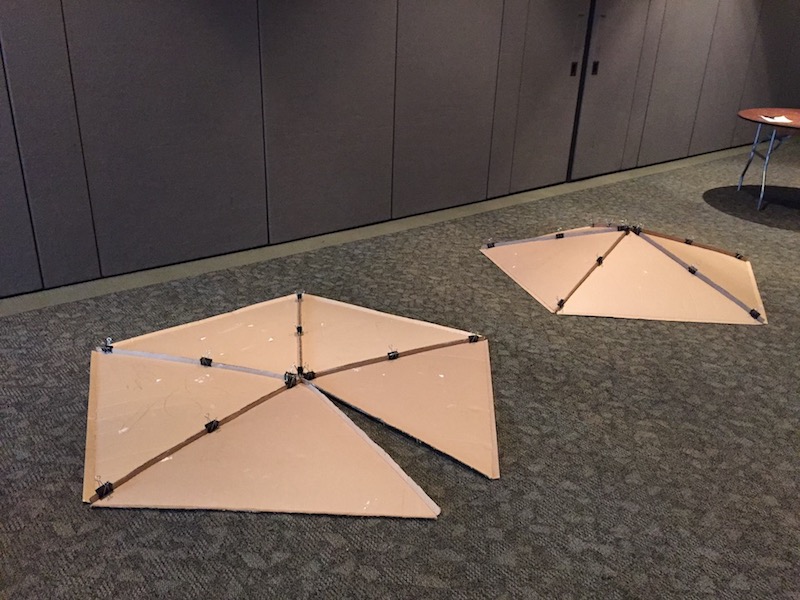
Assembling the Panels
Now comes the hard part: assembling the pieces. The figure below shows how they are to be arranged. All equilateral triangles have three blue sides, and all isosceles triangles have one blue side and two red (slightly shorter) sides. All of the isosceles triangles will be grouped together into pentagons, and the equilateral triangles will fill the gaps between the pentagons.
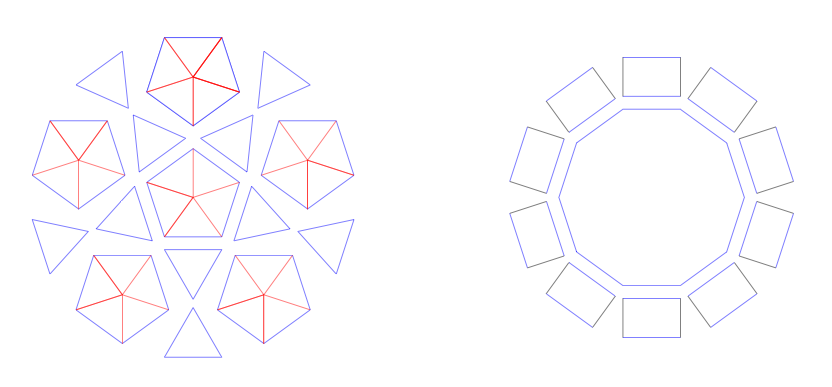
There are a few ways you could go about constructing the dome. We started our assembly by arranging all of the isosceles triangles into pentagons. When they are clipped together, they will not form flat pentagons, but will form a shape that resembles a pointed beanie, with the perimeter being a pentagon.
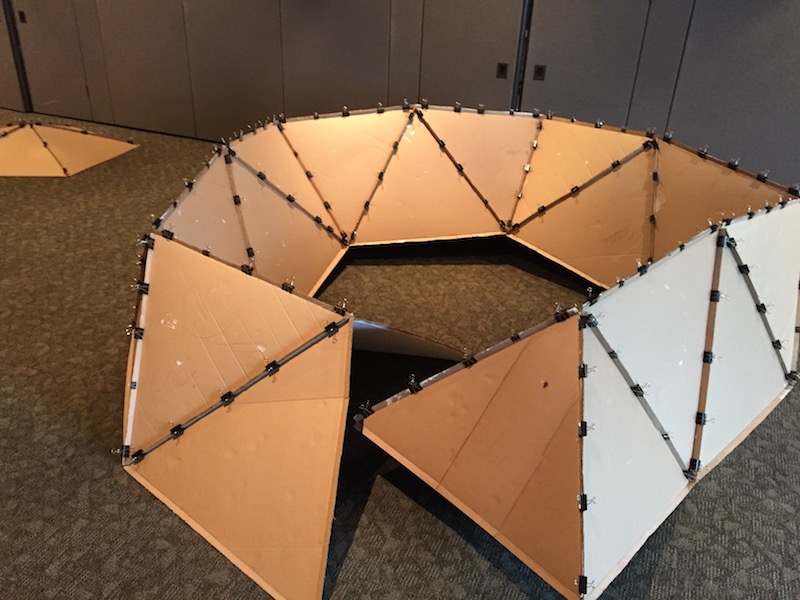
Once all of the pentagons are assembled, we made a ring of pentagons with the gaps filled in with equilateral triangles, and finally we placed the crowning pentagon on top. The binder-clipped cardboard dome was pretty sturdy once complete, but the pieces were extremely floppy until then. It may be better not to assemble all of the pentagons first, and just work upwards from the base of the dome in three rings of triangles, one ring at a time, with the third and final ‘ring’ being the crowning pentagon. Either way, whether you first group the isosceles triangles into pentagons or not, you will save the crown pentagon for last, sort of like assembling a Roman arch, with the final pentagon being the keystone. Prior to placing the ‘keystone’ pentagon, you should have something resembling this:
The second ‘ring’ of triangles actually folds up and down without too much difficulty. In any case, I suggest having several adults around to hold things where they are supposed to be until the final piece is bound in place, and having boxloads of binder clips to reinforce weak spots. We ended up with five binder clips along most seams, for a grand total, including the binder clips used in the base wall, of nearly 400 clips. (If you use one-inch flaps and jumbo binder clips, this raises the expense of the project by another $100 or so. Narrower flaps and smaller binder clips would lower the expense considerably, but the smaller the clips, the easier the panels will pull apart. Also, Jeff Adkins’ site suggests replacing the binder clips with sections of PVC pipe with a lengthwise slit, which sounds like a great idea, but I’ve never tried it.)
The base wall is relatively simple. The rectangular panels need to have one side equal to the bases of the triangles (44½″ in my case), and a height of whatever you want. Ideally, it should be about eye-height of a student sitting cross-legged on the floor, but it doesn’t make a great deal of difference. The dimensions of our rectangles are given in the figure above. (Remember, those are the dimensions without flaps.)
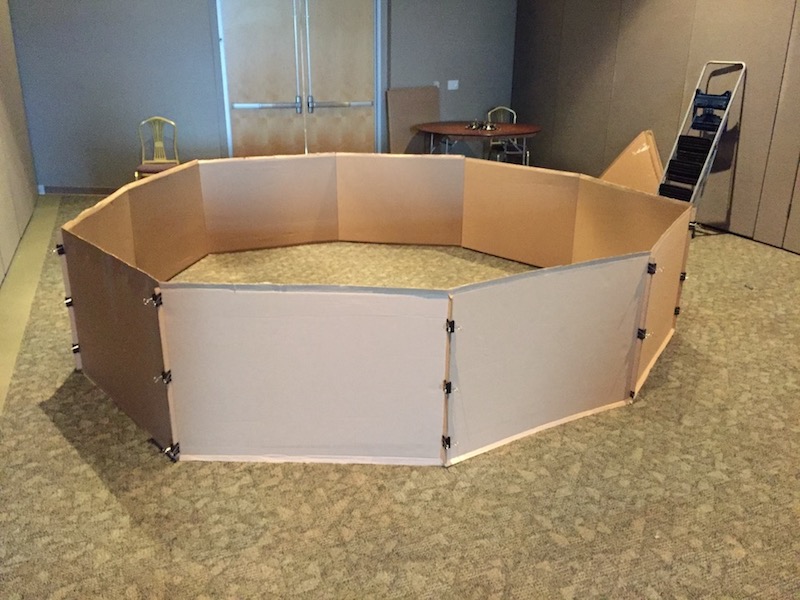
The bottom side of the rectangles will be resting on the ground and the flap on that side is actually superfluous. We just folded the flap sideways into a kind of ‘foot’ for the wall. Once the dome is assembled with plenty of binder clips, it is quite sturdy, and can be lifted fairly easily, so you can simply join the wall pieces together into a ring, then lift the dome onto the wall and fasten it with more clips.
Doors and Ventilation
How do you get in and out? You could cut a door into one of the sides, but I found it much simpler just to remove one of the wall panels and enter through the gap. We had our dome in a fairly dark room, so once inside we could just slide the panel crudely back into position without fastening it or having to worry too much about sealing out light. Furthermore, if the opening had been any smaller, adults and even junior high students might have had some difficulty crawling in and out.
If you have only one or two small groups using the planetarium, that will be all you need to do to prepare the dome. However, after extended use, an unventilated cardboard box containing sixteen people and a hot projector will get unbearably stuffy. We tried setting an electric fan on the floor near the door, and that helped a little, especially when we opened up an additional door on the opposite side of the dome to allow flow-through. If you intend to use your planetarium with lots of people for extended periods of time, I suggest trying to implement some of Jeff Adkins’ ideas on how to ventilate the dome.
The Sky-Projector
With the free planetarium software Stellarium, you can display realistic pictures of daytime or nighttime skies — including sun, moon, stars, planets, and even the blue daytime glow — on your computer screen. You can also speed up and slow down the motion, and add or turn off labels and marking lines. Stellarium gives you the ability to display beautiful and realistic skies for any location on earth, at any date and time. (One exception: while Stellarium can show just about anything under the sun, so to speak, one thing it does not do is to show the phase of the moon. The moon always appears as a full white disk, regardless of the phase. Perhaps in future editions…)
With a digital projector, you can shine this computer-generated image of the sky anywhere you wish. The trick is to make the picture on your rectangular screen fill the hemisphere of your planetarium dome. This can be done by warping the rectangular image into a semicircular image in a special way, and shining this semicircular image onto a hemispherical mirror (such as a typical hallway ‘security mirror’) placed at the base of the dome. This will then result in a hemispherical image appearing on the inside of your dome. The mathematics involved in properly ‘pre-warping’ the image on your computer screen from rectangular to semicircular is complex, but Paul Bourke figured out how to do it, and the people who make Stellarium incorporated his idea into their software. This means that all you have to do is to check a selection box, and Stellarium warps the image for you, making the image of the sky on your computer screen into a warped semicircle, and making the image projected onto your hemispherical dome look and move exactly the way the sky does.
So to make a virtual sky appear on the inside surface of your cardboard dome, you are going to need a digital projector, a hemispherical mirror, and a properly configured installation of the software Stellarium.
Setting up the Projector and Mirror
For the mirror, you will need an 18″ half-dome security mirror, like this one. This is an uncommon item in stores, so you may have to mail-order it.
Any digital projector manufactured in the last few years will probably be fine, although there are a few technical details that I have to admit I don't fully understand. We used an older XGA projector, which was ok for basic classroom purposes, but the image, which is greatly expanded when it is projected onto the dome, looked a bit coarse and grainy. An HD projector would be better. There is also a focal length issue that frankly confuses me a bit. The projector needs to be close enough to the mirror so that the image doesn’t grow larger than the mirror. The entire projected image (except for the upper corners, outside of the semicircle) needs to land on the mirror. Apparently the image also needs to be focused by the time it strikes the mirror, and this is an unusually close focal distance for a projector. If your projector can produce focused images a foot across on a screen six feet away, as ours did, it should be ok.
The mirror needs to be placed against one wall, at the base of the dome, and the projector needs to be placed in the interior of the planetarium, a few feet from the mirror, pointed towards it. (The sky image will have the best quality on the opposite side from the mirror, and will have the worst quality on the dome next to the mirror, so if you have all the students facing the same way, face them away from the mirror, and perform your planetarium show with the interesting stuff on the opposite wall.) I placed my projector and mirror on a cart so that I could roll the whole projector assembly in and out of the dome. However you support your projector and mirror, allow some flexibility in the positioning, because you will undoubtedly find that you need to make fine adjustments to improve the alignment and focus of the image on the inside of your dome. Here is what my projector assembly looked like:
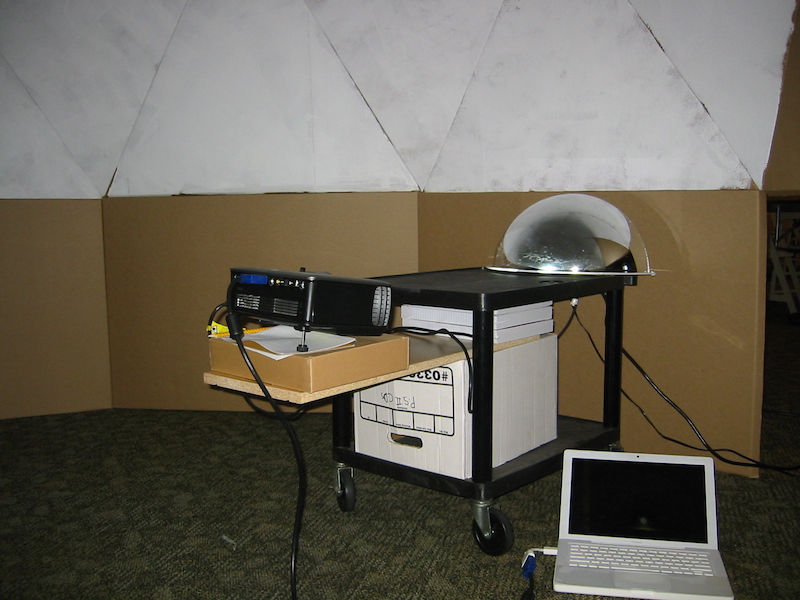
You may think that the projector looks as if it were projecting directly into the cart, but most projectors are intended to stand level and illuminate a screen considerably higher than they are (or lower, in the case of ceiling projectors), so they shine their beam upwards at a considerable angle. Therefore, to shine the beam horizontally, you need to tilt the projector well forwards. My mirror was a little bit below the bottom edge of the hemispherical dome. Ideally, it should be level with the bottom of the dome, but for classroom purposes, the difference isn't that important.
Configuring Stellarium
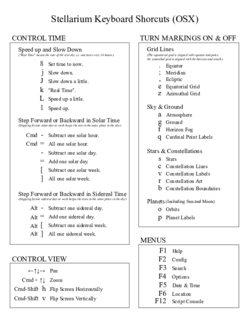
If you don’t have Stellarium yet, start by downloading Stellarium onto your computer and practice using it. Many of the features can be controlled either by mouse/trackpad, or by keyboard. I found the keyboard shortcuts to be very useful, but I could never remember what they were, so I made this “cheat sheet.” (However, there are still a few things that you can only do with the mouse/trackpad.)
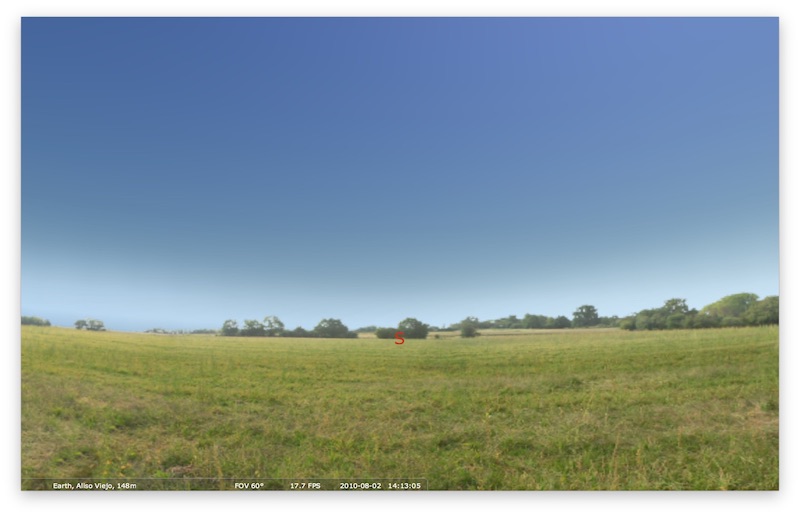
If you have never set the viewing location before, you will have to change it from the default (Paris, France), to your town. Do this in the “Location” window, either by selecting a nearby city, or entering your latitude and longitude coordinates. From now on, when you start the Stellarium program, it will begin with an un-warped South-facing view of the sky at the present time in your location.
In order to project the entire sky onto the dome, you will have to display the entire sky, and turn on the “spheric mirror distortion.” Display the entire sky by zooming out (on a MacBook, two-finger drag on the touchpad) and shifting the image (arrow keys) until you see a circle centered in your screen representing the entire sky.

Turn on the “spheric mirror distortion” by opening the “Configuration” window, clicking on the “Tools” tab, and checking the “spheric mirror distortion” box. The image should now look more or less like a semicircle, with the horizon lying along the bottom.

(For long-term use, you can save yourself the trouble of repeating these steps, as well as customize and fine-tune various settings for your particular planetarium, by editing Stellarium’s configuration file config.ini. For more details and recommendations on using Stellarium to drive a home planetarium, see Paul Bourke’s discussion of the issue).
If you now shine this image onto the mirror, it will reflect onto the interior of your dome, filling it with an image of the sky. You may have to adjust the height, distance, and orientation of the projector to get the sky-dome picture to align as well as possible with the cardboard dome. Mine was always a little bit skewed, probably because the mirror was too low.
Enjoy the View
With the sky projected properly onto the dome, the left and right arrow keys will rotate the sky (and the terrain on the horizon) around the zenith, just as if you the observer were twirling in a circle. This is helpful because the quality of the projected image is worst above the projector and best opposite to the projector (a drawback of the spherical-mirror-projection technique). With the arrow keys you can rotate the interesting part of the sky to the opposite side of the planetarium, where the image quality is best.
For added realism, I suggest “hazing” the sky a little bit. If you show kids a full, clear starry sky in all of its glory, and then they go home and look up at the hazy, glow-filled sky of a typical urban area, they may be able to find only a few stars, if any, and get discouraged with astronomy. It is a good idea to focus attention only on the brightest stars, and ignore the dim stars, at least at first, and to this end it is helpful to fiddle with the “relative scale” and the “light pollution” settings of Stellarium. (They are in the “Sky and Viewing Options” window.) You can always undo these things later to impress your viewers with the beauty of a clear, dark, desert sky in which you can see all the stars.
You will also probably need to flip the image horizontally. If you discover that everything in your sky is backwards, if constellations are mirror-images, text labels are printed in reverse, and everything is rising in the west and setting in the east, you will need to flip the image horizontally before you project it onto the mirror. If you intend to use your digital projector solely for the purpose of planetarium demonstrations, you may wish to find the setting for “rear projection mode” or “floor-rear configuration” or whatever your projector’s term is for horizontal flipping, and leave the projector set that way permanently. However, it is extremely simple also to flip the image horizontally in Stellarium. The key code on my MacBook is simply Cmd-H (or Cmd-Shift-h).
Planetarium Activities
Once you have your planetarium active and running, what do you do with it? Here are a couple of my ideas. In what follows, I am assuming that you are in mid-northern latitudes, like the United States, Europe, Korea, and Japan. All keyboard commands given below work on my MacBook. Check the help menu in Stellarium for commands on your computer.
For a first activity, I suggest just showing tonight’s sky, identifying the constellations, and seeing if you can tell directions simply from the stars (you can turn off the cardinal direction labels for this).
Next, try speeding up the motion of the stars a little, so you can see them slowly rising in the east and setting in the west, and you can see the circumpolar stars slowly circling around the pole. Use the J and L keys to speed up and slow down the rotation of the sky, and the K key to revert to normal “real-time” speed (once around every 24 hours). The students should notice that one point in the sky stands still, and that it is always in the same place, and everything else spins around it. Assuming you live in the Northern Hemisphere, this point in the sky around which everything else spins is the “North Pole of Stars.” This point is very nearly (though not exactly) occupied by Polaris, the North Star. There is also a “waist” or “belt” around the middle of the sky, like the “Equator of Stars.” You see this as an exact semicircle with one end touching due East and the other touching due West. This is the celestial equator, and you can mark it with a line by pressing the . (period) key. You can also add a full celestial grid lines to reinforce the concept of a spinning sphere of stars. Just tap the e key.
For another activity, you can show students the annual motion of the sun in the sky. Start by reviewing the daily motion of the sun through the sky — an arc from East to West peaking in the South. Then stop the sky and set the time to noon, with the sun at its peak in the Southern sky. Now use the “add one solar week” or “subtract one solar week” buttons ([ and ] on a MacBook) to advance or retreat in time, a week at a time, quickly through the year. You will see the sun oscillate around the equator, high in the summer (with the peak at the summer solstice, roughly June 21), low in the winter (with a low point at the winter solstice, roughly December 21), and cross the equator at the two equinoxes (roughly March 21 and September 21). Astute observers will notice that the sun doesn’t go straight up and down, but traces out a figure-8 over the course of a year. This is an “analemma,” and the width of it is due to the fact that the sun’s motion through the sky actually speeds up and slows down very slightly over the course of a year. In some months, it is slightly ahead of where it is supposed to be at 12 O’Clock, and in some months, it is slightly behind.
You can also observe the motion of sun, moon, and planets with respect to the “fixed” stars by “freezing” the stars in the same place every day. To jump forwards to the time tomorrow when the stars are in exactly the same position in the sky, you need to jump ahead by one “sidereal day,” which is four minutes less than 24 hours. To jump backwards, you need to subtract a “sidereal day.” (The corresponding keys are Alt – and Alt = on my MacBook). You may notice, if you haven’t already, that the sun, moon, and planets always lie along the same path through the stars. The stripe of constellations through which they pass is the zodiac, and the precise line through the middle of the zodiac along which the sun moves is the “ecliptic.” You can draw the ecliptic on the sky by pressing the , (comma) key. If you are not worn out yet, try spinning the sky with the ecliptic drawn in, and notice that it is like a tilted equator, with a high point in Gemini and Taurus (the sun is here in the summer), and a low point in Sagittarius and Scorpius (the sun is here in the winter).
Professional Planetarium Videos
I recently discovered that Loch Ness Productions offers a curated collection of a large number of planetarium videos, including their own movies in addition to those of several other museums and planetariums. You can stream these in a full-screen web browser, and thus project them onto your planetarium screen. I haven't viewed any of them myself, and I can't offer opinions as to the quality of the educational content. But if nothing else, there appears to be some very impressive immersion photography in several of them, including an all-sky view of auroras, and an immersive view of the underwater world.
Further Reading
If you want to explore the subject of small planetariums further, here are some links that you might find interesting:
- Jeff Adkins' original cardboard dome.
- Paul Bourke's invention of spheric distortion.
- For inflatable domes, and expensive but really cool “immersion” systems, see Elumenati
- DIY Planetariums offers a variety of plans for building your own planetarium. They are all inflatable, from what I see.
- If you are not on a budget, Digitalis Education offers domes and projection systems for sale, including planetarium software.