
A Paper Quadrant
Make a paper version of the classic surveying and navigation instrument, and use it to measure how tall things are, and how high things are in the sky.
Before GPS, before digital maps, before magnetic compasses, or even before detailed road maps, how did travelers keep from getting lost in new lands? If you were traveling to a distant city in a foreign land through wilderness, you wouldn't recognize the landmarks. Without some way to guide yourself, you'd never get to your destination. If you were sailing across the open ocean, you would have no landmarks whatsoever to guide you. Without technology, you have only one way to keep yourself from getting lost in the wild. You have to rely on nature's guidance system. You have to be able to read the sky to figure out where you are. But how do figure our your position on Earth from the sky over your head?
For that matter, how do you create a detailed map of the sky in the first place? If astronomers want to make precise maps of the stars and the constellations, they need some kind of measurement instrument to measure the precise positions of the stars. The first astronomers realized that if they wanted to make precise maps of the sky, they needed a way to measure angles in the sky.
Early navigators and timekeepers could get their bearings by measuring how high the sun and the stars are above the horizon. To this day, surveyors make precise maps of terrain by looking at a distant hill or valley, and measuring the angle of their line of sight above or below horizontal. If you can point a protractor at the sky, you have a useful measurement instrument.
Mapping the Sky and Navigating the Land With Protractors
To use this navigation and time-keeping system, you need to be able to read and understand the map in the sky. To use the sky as a precise clock and compass, you need to measure the locations of things in the sky precisely. A quadrant is one way to do that.
How high is the sun? How high is that star? To name “how high” something is in the sky, we measure the vertical angle between the object and the horizon. More precisely, we measure the angle between two lines: a horizontal line, and our line of sight to the target object. This angle gives us the “altitude” angle of the thing in the sky, in degrees. Measuring this angle is the job of a quadrant. A quadrant is essentially a protractor pointed at the sky.
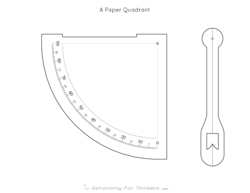
A Simple Traditional Quadrant
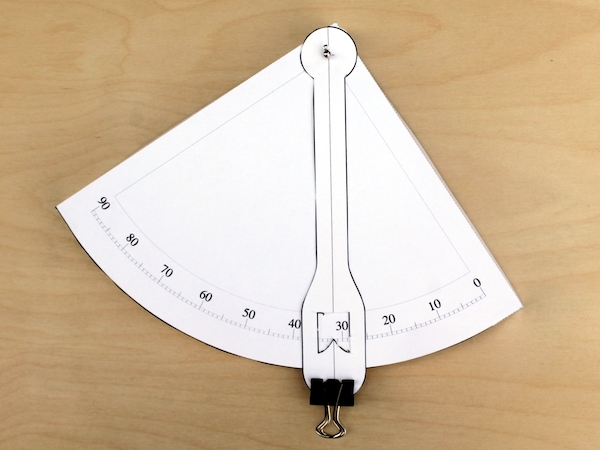
Most traditional hand-held quadrants were simple quarter-circles, with a weight on a string dangling from the corner. You would hold the quadrant upright, and sight along the upper edge, aligning that edge with your own line of sight. The weight is allowed to dangle freely, in which case the string at rest marks the line of gravity. The line of gravity is of course perpendicular to a horizontal line, and it falls along a scale graduated in degrees, thus indicating the angle between the upper edge and a horizontal line. A quadrant is a protractor pointed at the sky so you can measure angles of things out there.
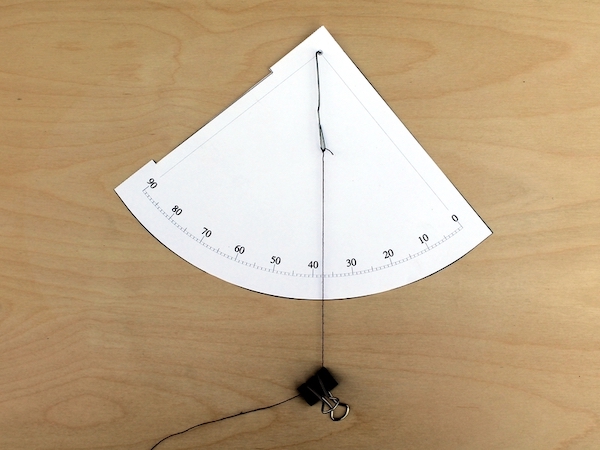
The handout below contains a printable template for a rudimentary quadrant. To make it, print it onto thick card stock and cut out the quarter-circle. (You could also print it onto normal paper and then glue it onto a stiffer base material, like cardboard or maybe balsa wood.) Then you simply press a pin or a paperclip through the mark at the center of the arc, and then dangle a weight on a string from the pin or the paperclip.
In practice, I found that the string was rather clumsy, it tended to dangle the wrong way, and it would often become twisted or tangled. For this reason, the paper design also includes an optional swing-arm. It is less traditional and perhaps less accurate than a freely dangling string, but for classroom purposes I think it works better. To attach the swing arm, simply press a pin of some kind through the alignment marks in the corner of the quadrant and the hub of the swing arm. An earring post and back works well for this. You will also probably want to attach a weight to the bottom of the swing arm. A binder clip is quick and easy, or you could glue a coin or two to the tab at the bottom.
If you want a traditional-style quadrant, or if you want to try making a heavier quadrant by pasting the design onto cardboard or foam board or balsa wood, or if you want to try laminating your quadrant, then this simple flat design is the design I would use. However, if you just want a cut-and-fold design that is a little sturdier and more usable than the floppy paper design, then I would recommend the following:
A Foldable Paper Quadrant
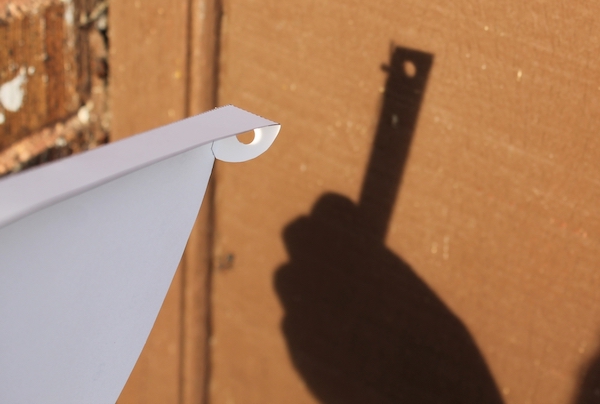
In addition to replacing the string with a swing-arm, I added a couple of folds to the edges of this design to help stiffen it, and to provide hand-holds. If you use a hole-punch to remove the two small circles, then you will also have two sighting holes to look through. You may find this easier on your eyes than trying to sight along the upper edge of the quadrant. (Note that your line of sight must be parallel to the upper edge of the quadrant, but it doesn't necessarily have to pass directly along the edge.)
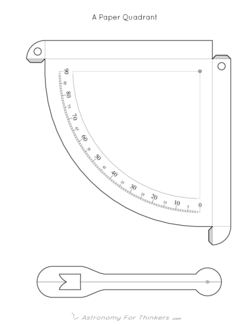
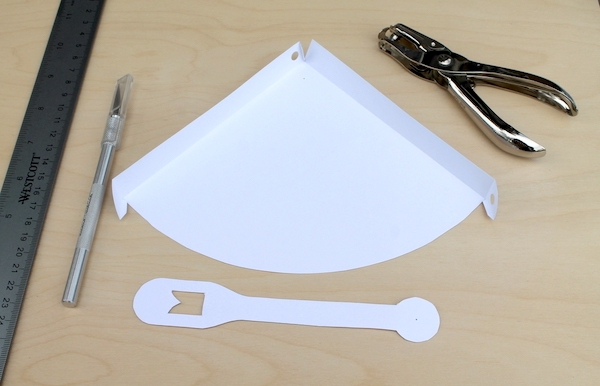
To make this version, print it onto cardstock, cut along the solid black lines, score and fold all dashed lines, and glue all shaded areas. You will also need to use a hole punch to remove the two sighting circles, and you will need to poke a hole for the axle pin, and you may find it more convenient to do these things before gluing the quadrant together. If you want to get really fancy, you could try to glue some threads across the sighting holes as “cross-hairs”.
Measuring Angles With a Quadrant
You can figure out a technique for using the quadrant that works best for you, but I suggest starting with the following: Hold the front flange in your left hand as a handle, and grasp the right face lightly with your fingertips. Allow the arm to swing freely, but be ready to pinch it gently with your fingertips to hold it in place. Now raise the quadrant, holding it vertically, with the “90” mark towards your face and the corner of the quadrant towards the thing you want to measure. Center the thing you want to look at in both sighting holes. When you are ready, gently press your finger against the swing arm to hold it in place while you lower the quadrant and turn it to look at the reading.
For practice, you might have fun trying to measure the altitudes of stars, and seeing if you can notice how they change hour by hour. You can also use the quadrant to measure the altitude of the sun, but I suggest aligning the quadrant by using shadows and a beam of sunshine, rather than sighting on the sun directly. (Under normal circumstances, a casual glance at the sun will not harm your eyes, especially if it is low in the sky, but you still want to avoid staring at it. Sailors and pirates used to have to navigate by staring at the sun and stars through their instruments, and this may help explain why pirates wore eye patches.)
Normally, astronomers, navigators, and surveyors want to measure how high something is above them. More precisely, they measure the angle between a horizontal line, and their line of sight to the object in question. Surveyors call this the “elevation angle” and astronomers usually call this the “altitude angle.” But sometimes you might want to measure the angle of something below you. Maybe you are on a hilltop or something, and you want to measure the angle down to something in the valley below you. Surveyors call this the “depression angle.” You can measure depression angles with your quadrant by looking through the instrument backwards, and then the angle shown on the side will be the angle below horizontal instead of the angle above horizontal.
How Far Are You From the Equator?
After you've spent some time studying the sun and the moon and the stars in the sky, you realize that they all appear to turn around us in daily circles. It is as if all of outer space is wrapped around us in a spherical map, and this spherical map spins. We can make a “globe” of outer space, and it has a North Pole and a South Pole and an Equator just like the Earth. But for most people on Earth that sphere in the sky is tilted. The Poles and the “Equator of Stars” are in different places in the sky for different people. For those of us in North America and Europe, the “North Pole of Stars” is up in the northern sky above the northern horizon, and the “South Pole of Stars” is hidden down below the southern horizon. (You can observe the spinning celestial sphere yourself just by paying attention to the motions of things in the sky. You can also record the motions by making time-lapse photographs of the sun or time-lapse photographs of stars.) And if you observe the sky from different places on Earth, you will notice that the tilt changes as you travel north or south. The farther north you go, the more the sphere “stands up straight.” If you could travel all the way to the North Pole of the Earth, the North Pole of Stars would be directly overhead. If you travel to the Equator, the celestial sphere lies flat, with the North Pole of Stars touching the northern horizon, the South Pole of Stars touching the southern horizon, and the Equator of Stars arcing straight overhead.
This fact means that if you are lost on Earth, you can easily tell how far north or south you are just by watching the sky. You can't figure out exactly where you are on Earth just by watching the sky, but you can at least figure out how far you are from the Equator. If you can measure the tilt of the spinning sky-sphere above you, then you can measure your exact latitude on Earth. Your latitude is the angle in degrees between yourself and the Equator of the Earth. If you live at the Equator, your latitude is 0, if you live at the North Pole your latitude is 90°, and if you live in the Northern Hemisphere, your latitude is somewhere in between. If you live in the continental United States, your latitude is somewhere around 30 or 40 degrees north of the Equator. (If you live in the Southern Hemisphere, you can use negative numbers, or you can use the same numbers but say “South” instead of “North”.) And you can measure your latitude with your quadrant.
If you live in the Northern Hemisphere, you have one star in your sky that sits very close to the “North Pole of Stars.” It is so close we might as well use it as a marker for the Pole. This star is known as “the North Star” or “Polaris,” and if you can find that star is in your sky and measure how high it is with your quadrant, that angle will also be your latitude on Earth. (We are lucky in the Northern Hemisphere. There is no special star to mark the “South Pole of Stars” in the sky, and if you live in the Southern Hemisphere you just have to estimate where the pole is based on your knowledge of the constellations.)
You could also measuring your latitude using the altitude of the sun at noon, but this is trickier because it depends on the season. Near the spring or fall equinoxes, you can measure the altitude of the sun at noon, and if you subtract this angle from 90° (in other words, use the complement of the angle), that number will be your latitude. In summer and winter you have to adjust your measurement a little, because the sun is higher in summer and lower in winter. In summer, subtract about 20° from your measurement before you subtract it from 90, and in winter, add about 20° from your measurement before you subtract it from 90.
Another way to measure your latitude from the stars would be to look straight up, wait until a star passes straight overhead, and identify that star. Then you can go to a star globe, and look up the latitude of the star on the star globe. That will be the same as your own latitude. (If you'd like some official vocabulary, the point straight overhead is the “zenith,” and the “latitude” of a star on the star globe is officially known as the “declination.” The declination is the angle between a star and the “Equator of Stars.”) The Polynesians were able to navigate across the Pacific Ocean without any technology, and they probably did it with the help of “zenith stars.”